This chapter contains the following topics:
Introduction to Print Reports from Disk
When you choose to print a report, you are given an option of printing it to disk. This chapter describes how you may view, print, delete and archive reports that have been printed to disk.
Printing to disk is called spooling (Save Printer Output OffLine). Printed reports do not go directly to the printer, but are saved on the hard disk.
The Print reports from disk selection addresses those reports which you have spooled. This selection enables you to perform the following print tasks:
| • | Print reports to the printer. |
| • | View reports using HTML or PDF format. |
| • | Print or display a list of spooled reports. |
| • | Create a stack of spooled reports which you can print all at one time. |
| • | Archive reports for later viewing, printing and deleting. General users cannot archive reports if they do not have access to the Archived reports menu selection. |
| • | Delete spooled informational reports and printed audit trail* reports. General users cannot delete reports from the Print a report menu selection if they do not have access to the Delete reports menu selection. |
| • | Purge saved registers which are used as part of an audit trail. |
| • | Reports printed to disk can be protected based on the menu a general user is assigned. Depending on a setting in Company information, if you are a general user you may only be able to access a report printed to disk if you have access to the menu selection for that report. For more information on this feature refer to the Protected disk reports field in the Company information chapter found in the PBS Administrator’s documentation. |
| • | Filter for reports printed from a specific package (module). System (RW) reports are available for all packages. |
* Audit trail reports are those reports that are needed for accounting integrity, such as the registers produced by posting and data purging. Audit trail reports must be printed to a hard copy before they can be deleted. Informational reports are produced when printing lists, aging reports and other miscellaneous information. They can be deleted before they are printed. All reports can be archived before they are printed. Also see Informational vs. Audit Trail Reports.
When it is necessary to print disk reports, you can print one, several, or all of them. This is sometimes called de-spooling.
This provides the capability of storing reports (overnight, for example) to produce one long print run.
Select
Print reports from disk from the CTL menu. Select Print a report.
If you elected to save registers in Company information and there is one or more reports that are beyond the number of days before a warning, a screen will display that has the following message:
Register(s) are on disk which should be purged using “Purged saved registers”.
In order to not see this message, you will have to purge saved registers. In Company information, increasing the maximum number of days you wish to retain saved registers may also remove the message, but only temporarily.
This selection enables you to print one report at a time. If you want to print more than one report at a time, use Stack reports. Provided that at least one report has actually been saved on the disk for the current company, a list of the available disk reports for the current company will be displayed.
Select Enter to continue.
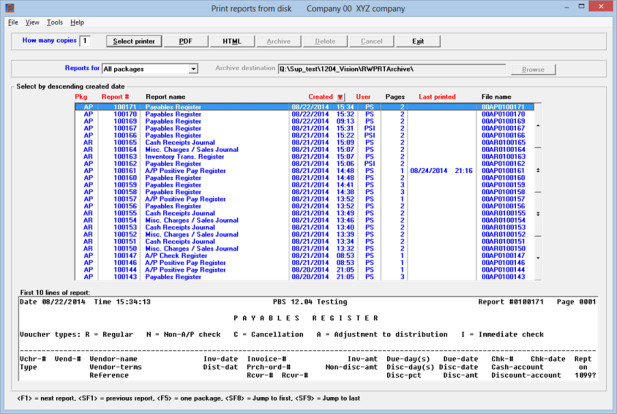
The following graphical mode screen displays:
Graphical Mode
The list box displays up to 25 reports at a time. You may sort the list by package (module), report #, date created, user ID and last printed date all in ascending or descending order. Click on the column name or the arrow to the right of the column name to change the sort or use the View options. Only column names in red may be sorted.
To find a report via the list box, the focus must be on the box (the data displays as blue). To locate a report, start typing the report number, date, user ID and module, depending on which sort field is selected. If you search by date, you must use the full date with slashes. For example you enter a date like this: 07/18/2018. You may also use the up/down arrows, Page up, Page down, Home and End keys to locate a report. The <F1> and <SF1> keys function the same as the up/down arrow keys.
Reports that display in the list box are available for printing and viewing. Whether a printed to disk report displays on the screen or not it is available for archiving. Some reports require printing before they may be deleted. The first 10 lines of the report display in the lower part of the screen.
When a report is found, you may select the <Enter> key or click on the Select printer button and the Printer window displays.
The list box columns include:
| Column | Description |
|---|---|
|
Pkg |
This is the package or module. The initials relate to the menu selection. For example, AP is A/P or Accounts Payable. One exception is RW which is the system reports. When searching for a module use UPPER case |
|
Report number |
Each report is saved with a unique number in sequence |
|
Report name |
This is the name of the report |
|
Created |
Report creation (printed to disk) date and time. When searching for a created date enter the full date like this: 07/18/2018 |
|
User |
User ID matching the login of the person who printed the report to disk. To keep this accurate we recommend that you provide each user their own login |
|
Pages |
Total number of pages for the report |
|
Last printed |
Date (if any) when the disk report was last sent to a printer. When searching for a last printed date enter the full date like this: 07/18/2018 |
|
File name |
The name of the file stored on the hard drive |
You may print 1 to 9 copies of the report. The default is 1.
If you select PDF or HTML, no matter what is entered the number will revert to 1.
|
Format |
1 digit |
|
Example |
Use the default of one copy |
The initial display includes all the packages that are setup per Company information, but may be altered to show only reports for one package. From the drop down list, select the package for the reports you want to display in the list box.
System reports display as RW and are available no matter which package is selected. Certain Sales Analysis reports are viewable from Accounts Receivable and other Sales Analysis reports from Inventory Control.
|
Format |
Drop down list. The default is All packages |
|
Example |
Use the default of All packages |
You have the following button options:
| Button | Keyboard | Description |
|
Select printer |
Alt+s |
To select a printer. If you are using PBS in Windows or Thin client you will have additional printer choices such as Windows printer, Company information printer, View as HTML and View as PDF. When you select an HTML or PDF printer the Last printed date is not updated |
|
|
Alt+p |
View the report in the Adobe PDF format. It allows you to display the report in Acrobat Reader or Adobe Acrobat Pro. Selecting this option does not update the Last printed date |
|
HTML |
Alt+m |
View the report in HTML format. Selecting this option does not update the Last printed date |
|
Alt+a |
Clicking on this button displays a window that allows you to archive one ore more reports to an archive location. For a full explanation of this window's functions see Archiving Reports below. |
|
|
Alt+d |
This button deletes an audit trail report if it has been printed. It deletes an informational report regardless. As a confirmation you will be asked if it is okay to delete the report. |
|
|
Cancel |
Alt+c |
This button is not active |
|
Exit |
Alt+x |
To exit to the menu. You may also use the <Esc> key |
After the report has printed, the Last printed column on the screen is updated with the date and time printed.
If you want to retain a report but you do not want it accessible from the Print a report screen you may archive it. After archiving a report you may view, print or delete it from the Archived reports menu selection. You may not bring it back (un-archive) to the Print a report selection.
After a report is archived it cannot be processed from the menu selections Print list of reports, Stack reports, Print a stack, Delete reports and Purge saved registers. For a full explanation of what you can do with archived reports see the Archived Reports section.
After you selecting the Archive button or <Alt+a> a window like the following displays:
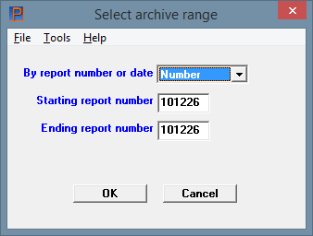
Use the default of Number to archive reports by number range or select Date to archive reports by date range.
Starting number/date and Ending number/date
Enter the range of reports that you want archived.
The starting and ending report number fields default to the report selected in the Print a report list box. When you change it to archive by date there is no default range.
Use the default for the number range or enter any range of numbers or dates you prefer. The range of reports that can be archived do not have to display in the list box.
Select OK to archive the range of reports or Cancel to return to the Print a report screen.
If a report was not found in the range a No reports found for archiving window displays. Select OK to return to the Print a report screen.
The following character mode screen displays:
Character Mode
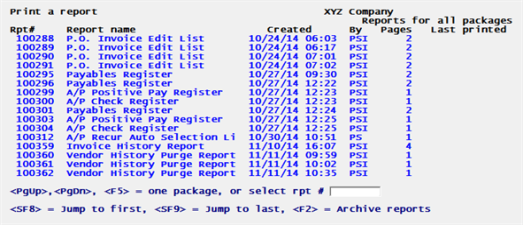
The information contained on this screen is:
| • | Report number |
| • | Report name, due to space restrictions part of the name may be cut off |
| • | Report creation (printed to disk) date and time |
| • | Initials of the person who printed the report to disk |
| • | Total number of pages for the report |
| • | Date (if any) when the disk report was last sent to the printer |
The initial display includes all installed packages, but may be altered to show only one package.
Type in the number of the report you wish to display or print. The report must be one of those currently displayed on the screen.
Options
You may also use one of the options:
|
<PgDn>, |
For the next or previous page respectively (if there is one) |
|
<SF8>, |
For the first or last page respectively (if there are more than one and you are not already on the first or last) |
|
<F2> |
For archiving reports. Selecting this displays a window that allows you to send the selected report to an archive location. For a full explanation of what you can do with archived reports see Archived Reports |
|
<F5> |
To toggle between displaying all reports for this company, or only those for a single package. When going from “All” packages to a single package; you will be shown a menu from which to choose which package |
|
<Esc> |
To exit the window back to the menu |
|
Format |
9999999 |
|
Example |
Type 68 |
Please select: 1-Display 2-Print 3-Delete
After you select a report you can send the report either to the screen or the printer. You may also delete the report if the conditions are correct and you have the permission. Each will be discussed in turn.
|
Format |
One digit, either 1, 2 or 3. There is no default. |
|
Example |
Type 1 to display. |
Display
From page
You can start the display at any page. Enter the starting page number.
|
Format |
999999 The default is 1. |
|
Example |
Press <Enter> to begin at the beginning. |
The report will scroll up the screen. This process is very similar to what happens when you choose Display on screen from the printer selection menu.
Options
While the report is displaying, you may use the options:
|
<F1> |
To interrupt the display temporarily |
If you choose <F1> to stop the display, or if you merely reach the end of the report, your new choices are:
|
<Esc> |
To terminate viewing the report |
|
<F1> |
To resume the display (if you have paused in mid-display) |
|
<F2> |
To view other portions of the report. |
If you choose <F2>, you can review any part of the report displayed up to the point of your interruption (but not beyond). Your choices now become:
|
<Esc> |
To return to the choices just described |
|
<Home> |
To display the first page of the report |
|
<End> |
To display the last page of the report reached so far |
|
<PgUp>, |
To move up and down a page at a time |
|
<Up>, <Down> |
To move up and down a line at a time |
|
<Left>, <Right> |
To view the left or right 80 columns of a 132-column report |
|
Format |
Only option key input is accepted here.] |
|
Example |
After displaying the report, press <Esc> to return to the selection menu. |
Type 1 to re-select the same report. Then type 2 to print it rather than display it.
Printer selection
You will be offered a choice of printers.
If you are using PBS in Windows or Thin client you will have additional printer choices such as Windows printer, HTML and possibly PDF if it is set up on your system. A PDF printer will allow you to display the report in Acrobat Reader or Adobe Acrobat. When you select an HTML or PDF printer, the Last printed date does not change.
Print pages through
Enter a range of pages to print.
At the ending page field, you may also press <F2> for the last page.
|
Format |
999999 at each field. The default for the starting page is 1. |
|
Example |
Press <Enter> and then <F2> to print the entire report. |
If an ending page number is specified, the report will print only until the first occurrence of that page number. This makes a difference for reports which are not paginated continuously—at intervals they start over again from page one. To be sure of printing the entire report, use <F2>.
How many copies ?
Enter the number of copies (from 1 to 9) to print.
|
Format |
9 The default is one copy |
|
Example |
Press <Enter> |
After the report has printed, the Last printed column on the screen is updated with the date and time printed.
Delete
Type 1 to re-select the same report. Then type 3 to delete it.
|
Example |
Type 3 to delete. |
Audit trail reports must be printed before they can be deleted. If it is an audit trail report and it has not been printed yet a message displays letting you know. Informational reports do not have to be printed. For more information see Informational vs. Audit Trail Reports.
General users will not be able to delete any reports if they do not have access to the Delete reports menu selection.
Reports that are deleted are gone and cannot be brought back.
If you want to retain a report but you do not want it to be available on the Print a report screen you may archive it. After archiving a report you may view, print or delete it from the Archived reports menu selection. You may not bring it back (un-archive) to the Print a report selection.
After a report is archived it cannot be processed from the menu selections Print list of reports, Stack reports, Print a stack, Delete reports and Purge saved registers. For a full explanation of what you can do with archived reports see Archived Reports.
After you selecting <F2> to archive reports a window like the following displays:
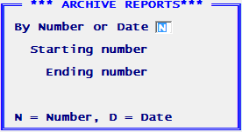
By report number or date
Use the default of N for Number to print by number range or enter D to print by date range.
Starting number/date and Ending number/date
Enter the range of reports that you want archived.
Enter any range of numbers or dates you prefer. The range of reports that can be archived do not have to display on the screen.
OK to archive?
Use the default of Y to archive the report range or enter N to return to the Print a report screen.
If a report was not found in the range a No reports found for archiving window displays. Select OK to return to the Print a report screen.
This function enables you to obtain a list of those reports which are stored on your hard disk. Unlike most PBS selections, this one lets you process a different company than your own, or several companies at once.
This report list will not include a list of archived reports.
Select
Print list of reports from the Print reports from disk menu.
The following screen displays:
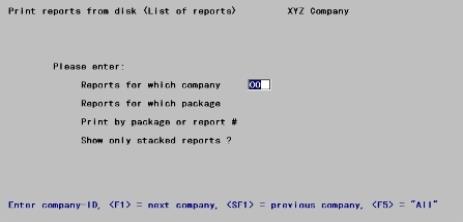
Reports for which company
If you are not using multiple companies, this field is skipped.
Enter the company-ID of the company for which you want to print a list of reports.
Options
You may also use one of the options:
|
<F1> |
For the next company |
|
<SF1> |
For the previous company |
|
<F5> |
To print a list of reports for “All” companies |
|
Format |
2 characters |
Reports for which package
Enter the ID of the package whose list of reports you want to print. A menu will list all installed packages. You may also press <F5> to print a list of reports for “All” packages.
|
Format |
99 |
Print by package or report #
This field displays as (Not applicable) if you selected in the above field to print a list for a particular package.
Enter P to print each package separately. Enter R to list reports in report number sequence, regardless of package.
In either case, if you are printing “All” companies then each company’s reports will be printed separately.
|
Format |
One letter, either P or R |
Show only stacked reports ?
Your response determines whether only those reports which have been stacked will be printed. “Stacking” will be described in the next section.
|
Format |
One letter, either Y or N |
The Stacking reports selection associates several reports into a single stack, which can then be printed in one continuous print run. This feature (among other uses) allows unattended overnight printing of the day’s routine reports, which in turn frees up your printers for the reports you need immediately.
Note that printing a stack ties up your computer during printing, just as printing a report.
Creating a stack and printing it are two different selections. Here we discuss creating the stack.
Only one stack exists at a time, but that stack can contain reports from different companies and/or from different packages.
If you stack a report by mistake, you can unstack it.
If you are in a multi-user environment, one operator can be adding reports to the stack even as the stack is printing. Reports added on-the-fly may not print until the next time you run the Print a stack selection.
You cannot stack archived reports. You may only print them one a time from the Archived reports menu selection.
Select
Stack reports from Print reports from disk.
If you elected to save registers in Company information and there is one or more reports that are beyond the number of days before a warning, a screen will display that has the following message:
Register(s) are on disk which should be purged using “Purged saved registers”.
In order to not see this message, you will have to purge saved registers. In Company information, increasing the maximum number of days you wish to retain saved registers may also remove the message.
Select Enter to continue. A screen similar to the following displays:
If you do not use the multi-company feature, this screen is skipped.
Reports for which company
Enter the company-ID of the company for which you want to stack reports.
Options
You may also use one of the options:
|
<F1> |
For the next company |
|
<SF1> |
For the previous company |
|
<F5> |
To toggle between viewing “All” companies and viewing a single company. |
Reports you have already stacked in one company remain in the stack when you switch to a different company, even though they are no longer visible on the screen. Recall that there is only one stack for all companies.
|
Format |
2 characters |
Reports for which package
A menu of all installed packages displays on the screen. Type the number corresponding to the desired package.
Options
You may also use one of the options:
|
<F5> |
To view reports for “All” packages. |
|
<Esc> |
To end. |
Reports you have already stacked in one package remain in the stack when you switch to a different package, even though they are no longer visible on the screen. There is only one stack for all packages.
|
Format |
Two characters |
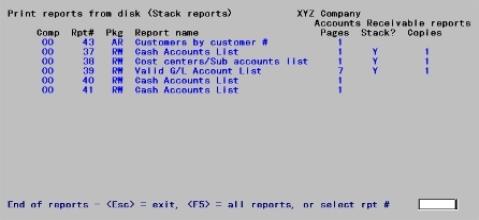
A screen similar to the following displays:
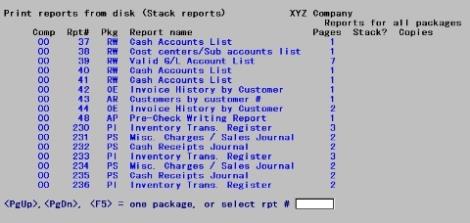
The initial display includes all installed packages.
The Stack? column identifies which reports have been stacked—not just in this session, but by anybody. A report remains stacked until it is printed.
When you select a report, the cursor moves first to the Stack? column of that row (so you can specify the report is to be stacked, or unstack a report previously stacked in error). It then moves to the Copies column (so you can state how many copies you want). The default is one copy, but you can request up to nine.
Rpt #
Type in the number of the report you wish to stack. The report must be one of those currently displayed on the screen.
Options
You may also use one of the options:
|
<PgDn>, |
For the next or previous page respectively (if the list of reports extends beyond the current screen). |
|
<Home> |
For the first or last page respectively (if there is more than one page and you are not already on the first or last page) |
|
<F5> |
To toggle between displaying all reports for this company, or only those for a single package. When going from All packages to a single package; you will be shown a menu to choose which package. |
|
<Esc> |
To end. |
|
Format |
9999999 |
|
Example |
Select reports you wish to stack. The screen displays your selected reports. |
The screen now displays as:
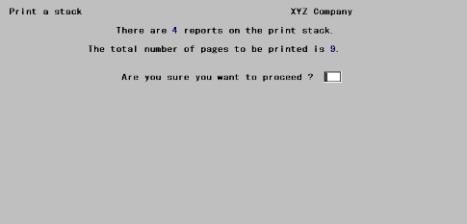
This function prints those reports which have been placed in a stack. Stacking has been described in the previous section.
Select
Print a stack from the Print reports from disk menu.
If you elected to save registers in Company information and there is one or more reports that are beyond the number of days before a warning, a screen will display that has the following message:
Register(s) are on disk which should be purged using “Purged saved registers”.
In order to not see this message, you will have to purge saved registers. In Company information, increasing the maximum number of days you wish to retain saved registers may also remove the message.
Select Enter to continue. A screen similar to the following displays:
If you have more than one printer, select which one to send the stack to. You can also select the Windows printer.
Stacked reports are printed in the order in which they appear on the screen; not the order in which they were stacked.
While printing, the screen displays a running count of its progress:
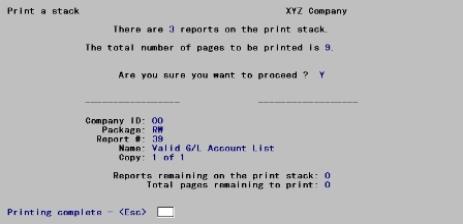
As each report on the stack finishes printing, it is removed from the stack. When all reports have completed, the stack is empty. The reports remain on your hard disk, however. To remove the reports, use the Delete reports selection.
This function lets you remove reports from the hard disk, so that they no longer appear on the list of disk reports.
You may only delete archived reports from the Archived reports menu selection.
The system distinguishes between informational reports and audit trail reports. The latter include reports needed for accounting integrity, such as the registers produced by posting and when purging data. If the report you wish to delete is part of an audit trail, you will not be allowed to delete it until all pages of the report have been printed to at least one hard copy, i.e. to a printed copy. When an informational or audit trail report has been printed, a Last printed date displays. You may archive any report, including audit trail types.
Select
Delete reports from the Print reports from disk menu.
A screen similar to the following displays:
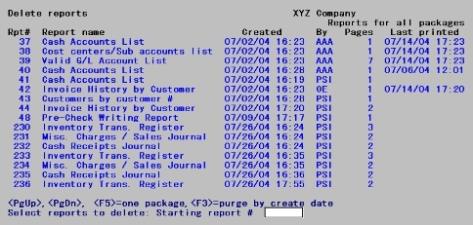
The initial display includes all installed packages.
Select reports to delete
Type in the number of the first and last report you wish to delete. It is not required that either number be displayed on the current screen, or even exist. However, there must be at least one report eligible for deletion within the range selected.
Options
You may also use one of the options:
|
<PgDn>, |
For the next or previous page, if more than one exists |
|
<Home> |
For the first or last page, if more than one |
|
<F5> |
To toggle between viewing “All” packages and viewing a single specified package (a menu will appear for you to select the package). |
|
<F3> |
To purge reports by creation date instead of by number. You will be asked to enter the cut-off date. |
|
<Esc> |
To exit. |
Regardless of whether you are deleting by number or by date, no report will be deleted that is not in the package and company selected. A deleted report may however occupy a different screen than the one currently being displayed.
|
Format |
9999999 for each report |
|
Example |
Press <Esc> to avoid deleting any of the reports you have created in these examples. |
|
Note |
If the report to be deleted is part of an audit trail, it must be fully printed before deletion is allowed. Such reports do not prevent other reports within the selected range from being deleted. |
Saved registers are extra copies of audit trail reports which are automatically saved to disk when you print the register on paper.
This safety feature, which protects against accidental loss of these vital records, is nevertheless optional. To use it you have to turn it on first using Company information.
Saved registers appear along with other reports in the Print a report screen, and may be printed like any other report. However, they do not appear on the Delete reports screen and can only be deleted using this selection.
If a saved register has been archived it can no longer be deleted by this selection. You must delete the report from the Archived reports menu selection.
Select
Purge saved registers from the Print reports from disk menu.
The following screen displays:
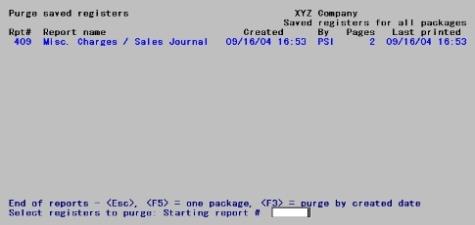
The initial display includes all installed packages.
Options
Enter the number of the register to delete, or use one of the options:
|
<F5> |
To toggle between viewing All packages and viewing a single specified package (a menu will appear for you to select the package). |
|
<F3> |
To purge registers by creation date rather than by number. You will be asked to enter a date. |
|
<Esc> |
To exit from purging registers. |
Regardless of whether you are purging by number or by date, no register will be purged that is not in the package and company selected. It may however be on a different screen than the one currently being displayed.
|
Format |
2 characters |
|
Example |
Press <Esc> to avoid deleting any of the registers you have created in these examples. |
|
Note |
If you do not occasionally delete saved registers, you will be reminded when you access the menu selections Print a report, Stack reports and Print a stack. |
You can control, in Company information, how old the oldest register must be in order to set off this warning.
From the Print a Report screen there is an option to Archive your reports. If you selected to archive one or more reports they can be accessed here. The archive reports feature allows you to remove reports from the Print a report menu selection for long time storage.
The Archived reports selection contains those reports which you have moved from Print a report. This selection enables you to perform the following print tasks:
| • | Print reports to the printer. |
| • | View reports using html or PDF format. |
| • | Delete unneeded spooled informational reports by number or date range. |
| • | Reports printed to disk can be protected based on the menu a general user is assigned. If you are a general user you will only be able to access a report printed to disk if you have access to the menu selection for that report. For more information on this feature refer to the Protected disk reports field in the Company information chapter found in the PBS Administrator’s documentation. |
| • | Filter for reports printed from a specific package (module). System (RW) reports are available for all packages. |
Audit trail reports are those reports that are needed for accounting integrity, such as the registers produced by posting. Audit trail reports must be printed before they can be deleted. Non audit trail, also called informational reports, can be deleted before they are printed. All reports can be archived before they are printed.
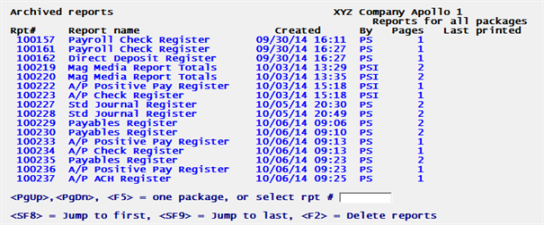
Archived reports cannot be processed from the menu selections Print list of reports, Stack reports, Print a stack, Delete reports and Purge saved registers. You may only print one report at a time. However you may delete a range of reports.
Select
Archived reports from the Print reports from disk.
The following screen displays:

The list box displays up to 25 archived reports at a time. You may sort the list by package (module), report #, date created, user ID and last printed date, all in ascending or descending order. Click on the column name or the arrow to the right of the column name to change the sort or use the View options. Only column names in red may be sorted.
To find a report via the list box, the focus must be on the box (the data displays as blue). To locate a report, start typing the report number, created date, user ID, package and last printed date, depending on which sort field is selected. If you search by date, you must use the full date with slashes. For example you enter a date like this: 07/18/2017. You may also use the up/down arrows, Page up, Page down, Home and End keys to locate a report. The <F1> and <SF1> keys function the same as the up/down arrow keys.
Reports that display in the list box are available for printing and viewing. They may be deleted if they are audit trail reports and have been printed. Non-audit trail reports may be deleted even if they have not been printed. The first 10 lines of the report display in the lower part of the screen.
When a report is found, you may select the <Enter> key or click on the Select printer button and the Printer window displays.
The list box columns include:
| Column |
Searchable |
Description |
|---|---|---|
|
Pkg |
Yes |
This is the package or module. The initials relate to the menu selection. For example, AP is A/P or Accounts Payable. One exception is RW which is the system reports. When searching for a package use UPPER case; AP, not ap |
|
Report number |
Yes |
Each report is saved with a unique number in sequence |
|
Report name |
No |
This is the name of the report |
|
Created |
Yes |
Report creation (printed to disk) date and time. When searching for a date created enter the full date like this: 07/18/2017 |
|
User |
Yes |
User ID matching the login of the person who printed the report to disk. To keep this accurate we recommend that you provide each user their own login |
|
Pages |
No |
Total number of pages for the report |
|
Last printed |
Yes |
Date (if any) when the disk report was last sent to a printer. When searching for a last printed date enter the full date like this: 07/18/2017 |
|
File name |
No |
The name of the file stored on the hard drive |
You may print 1 to 9 copies of the report. The default is 1.
If you select PDF or HTML, no matter what is entered the number will revert to 1.
|
Format |
1 digit |
|
Example |
Use the default of one copy |
The initial display includes all the packages that are setup per Company information, but may be altered to show only reports for one package. From the drop down list, select the package for the reports you want to display in the list box.
System reports display as RW and are available no matter which package is selected. Certain Sales Analysis reports are viewable from Accounts Receivable and other Sales Analysis reports from Inventory Control.
|
Format |
Drop down list. The default is All packages |
|
Example |
Use the default of All packages |
You have the following button options:
| Button | Keyboard | Description |
|
Select printer |
Alt+s |
To select a printer. If you are using PBS in Windows or Thin client you will have additional printer choices such as Windows printer, Company information printer, View as HTML and View as PDF. When you select an HTML or PDF printer the Last printed date is not updated |
|
|
Alt+p |
View the report in the Adobe PDF format. It allows you to display the report in Acrobat Reader or Adobe Acrobat Pro. Selecting this printer does not update the Last printed date |
|
HTML |
Alt+m |
View the report in HTML format. Selecting this printer does not update the Last printed date |
|
Archive |
Alt+a |
This button is not active |
|
Delete |
Alt+d |
Selecting this button displays a window where you may delete one or more reports Selecting the <F3> key also displays the window. For more information on this window see Delete Archived Reports |
|
Cancel |
Alt+c |
This button is not active |
|
Exit |
Alt+x |
To exit to the menu. You may also use the <Esc> key |
An audit trail report must be printed before it can be deleted. The program deletes informational reports regardless. For a full explanation of the report types see Informational vs. Audit Trail Reports.
After selecting the Delete button or <F3> key the following window displays:
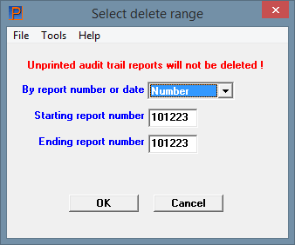
Use the default of Number to delete by number range or select Date to delete by date range.
Starting number and Ending number
Start date and End date
Enter the range of reports that you want deleted.
The starting and ending number fields default to the report selected in the reports list box. When you change it to delete by date there is no default range.
Use the default for the number range or enter any range of numbers or dates you prefer. The program can delete reports that do not display in the list box. However it will only delete reports from the company your are logged into.
Select OK to delete the range of reports or Cancel to return to the Archived reports screen.
This screen displays:
The information contained on this screen is:
| • | Report number |
| • | Report name, due to space restrictions part of the name may be cut off |
| • | Report creation (printed to disk) date and time |
| • | Initials of the person who printed the report to disk |
| • | Total number of pages of the report |
| • | Date, if any, when the disk report was last sent to a printer |
The initial display includes all installed packages, but may be altered to show only one package.
Type in the number of the report you wish to display or print. The report must be one of those currently displayed on the screen.
Options
You may also use one of the options:
|
<PgDn>, |
For the next or previous page respectively (if there is one) |
|
<SF8>, |
For the first or last page respectively (if there are more than one and you are not already on the first or last) |
|
<F2> |
For deleting reports. Selecting <F2> displays a window where you may enter a range of reports. For more information see Archived Reports Deletion |
|
<F5> |
To toggle between displaying all reports for this company, or only those for a single package. When going from “All” packages to a single package; you will be shown a menu from which to choose which package |
|
<Esc> |
To exit the window back to the menu |
|
Format |
9999999 |
|
Example |
Type 68 |
Please select: 1-Display 2-Print
You can send the report either to the screen or the printer. Each will be discussed in turn.
|
Format |
One digit, either 1 or 2. There is no default. |
|
Example |
Type 1 to display. |
From page
You can start the display at any page. Enter the starting page number.
|
Format |
999999 The default is 1. |
|
Example |
Press <Enter> to begin at the beginning. |
The report will scroll up the screen. This process is very similar to what happens when you choose Display on screen from the printer selection menu.
Options
While the report is displaying, you may use the options:
|
<F1> |
To interrupt the display temporarily |
If you choose <F1> to stop the display, or if you merely reach the end of the report, your new choices are:
|
<Esc> |
To terminate viewing the report |
|
<F1> |
To resume the display (if you have paused in mid-display) |
|
<F2> |
To view other portions of the report. |
If you choose <F2>, you can review any part of the report displayed up to the point of your interruption (but not beyond). Your choices now become:
|
<Esc> |
To return to the choices just described |
|
<Home> |
To display the first page of the report |
|
<End> |
To display the last page of the report reached so far |
|
<PgUp>, |
To move up and down a page at a time |
|
<Up>, <Down> |
To move up and down a line at a time |
|
<Left>, <Right> |
To view the left or right 80 columns of a 132-column report |
|
Format |
Only option key input is accepted here.] |
|
Example |
After displaying the report, press <Esc> to return to the selection menu. |
Type 1 to re-select the same report. Then type 2 to print it rather than display it.
An audit trail report must be printed before it can be deleted. The program deletes informational reports regardless. For a full explanation of the report types see Informational vs. Audit Trail Reports.
You may delete reports by report number or date range.
After selecting the <F2> key the following window displays:
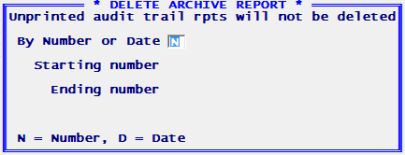
By Number or Date
Use the default of N for Number to delete by number range or enter D for Date to delete by date range.
Starting Number or Date
Enter the range of report numbers or dates that you want deleted.
Enter any range of numbers or dates you prefer. The program will delete reports outside of the range that display on the screen. It will only delete reports from the currently selected company.
OK to archive?
Use the default of Y delete the range of reports or enter N to return to the Archived reports screen. After selecting Y a window displays indicating how many reports were deleted.